




نوع الجسم
الأسعار
أفضل مكان للشراء

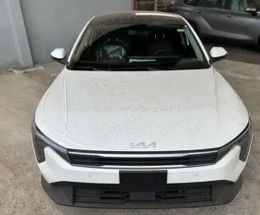
Kia K4 سيدان
55,000 - 111,225 AED
أفضل مكان للشراء
تمويل السيارة
مع الضمان
التبادل ممكن
فقط مع فيديو
فقط مع خصومات
للتصدير فقط
6 إعلانا
كن أول من يعرف عن الإعلانات الجديدة
احفظ فلاتر بحثك لكي تجد الإعلانات التي تحتاجها بشكل أسرع.
1 - 6 إعلانا
من أصل 6
يبدأ سعر Kia K4 من 55,000 AED ويصل إلى 111,225 AED. قد تختلف التكلفة النهائية على الطريق قليلاً حسب التأمين والتسجيل والملحقات الاختيارية.
Kia K4 سيدان
أفضل مكان للشراء
Kia K4 أوتوماتيك
أفضل مكان للشراء
Kia K4 ناقل حركة متغير باستمرار
أفضل مكان للشراء
Kia K4 بنزين
أفضل مكان للشراء
Kia K4 2026
أفضل مكان للشراء
Kia K4 2025
أفضل مكان للشراء
Kia K4 الدمام
أفضل مكان للشراء
Kia K4 جدة
أفضل مكان للشراء
Kia K4 الرياض
أفضل مكان للشراء
Kia K4 مكة المكرمة
أفضل مكان للشراء
Kia K4 المدينة المنورة
أفضل مكان للشراء
يوضح الرسم البياني ديناميكيات متوسط سعر الطراز في سوق السيارات المستعملة خلال العام الماضي. تساعدك هذه البيانات على تقييم جدوى الشراء وتوقع القيمة المستقبلية للسيارة.
قد تختلف الأسعار على AUTO.AE عن تكلفة البيع الفعلية. تستند البيانات إلى قاعدة بياناتنا من السيارات المباعة والإعلانات الحالية. للحصول على تقييم دقيق، استخدم أداتنا.

Replace Kia Pegas brake pads and rotors according to condition, rather than a single mileage for every car. Frequent urban stops, carrying passengers and a sticking caliper affect service life differently. Decide on repairs after inspecting and measuring both axles. Looking at one visible outer pad or judging a rotor by its wear lip is insufficient. The Pegas description on kia.com lists disc brakes on all four wheels. This makes rear brake inspection relevant, but does not establish identical parts across every model year and trim. Before ordering, check the VIN, parts catalogue and components actually fitted. Neither silence nor the absence of dashboard warnings replaces inspection of the linings and working surfaces. In brief. Replace Kia Pegas pads and rotors according to wear and defects. Inspect both axles and the pads on each side of every rotor. Match the order to the VIN and fitted components; correct the cause of uneven wear. How to Select Kia Pegas Brake Components Give the workshop the VIN, build date, engine and transmission. The Pegas name in an advert and a component’s appearance do not guarantee compatibility. Confirm part numbers separately for the front and rear axles. If a previous owner modified the brakes, also check the markings on the fitted calipers and rotors: the original specification may no longer fully describe the car. For rotors, verify diameter, working thickness, height and mounting dimensions. For pads, check shape, part number, installation axle and caliper compatibility. Confirm the required fitting hardware. Wheel size does not identify a suitable kit, and similar-looking parts from another Kia model should not be treated as interchangeable without checking fitment. Front axle. Verify rotors, pads and caliper specification. Rear axle. Confirm the parts and parking brake mechanism. Different model years. Check applicability by VIN and catalogue. Modified brakes. Match component markings and dimensions to the order. Why Mileage Does Not Set a Mandatory Replacement Point Follow the inspection schedule for your Pegas. Scheduled servicing does not automatically require new pads, while low mileage does not rule out binding or corrosion. Record pad material and rotor thickness by wheel: repeat measurements help establish the wear rate. New persistent noise, vibration, pulling or altered pedal travel calls for an additional diagnostic check. When Replacement Is Necessary Each replacement needs a confirmed reason. Inspect pads for remaining friction material, integrity and contamination; rotors for thickness, surface damage and deviations in geometry. A serviceable rotor does not necessarily need replacing with every pad set. However, spare thickness does not make cracks or other unacceptable defects safe. The lining has reached its wear limit, separated, suffered damage or become contaminated with oil or brake fluid. The rotor has worn to its minimum permitted thickness or has unacceptable cracks or damage. Runout or thickness variation exceeds the specification and cannot be corrected by an approved method. Binding or a leak has damaged components; the cause must be addressed alongside replacement. Do not postpone diagnosis of metallic grinding. If the pedal sinks, fluid leaks, a wheel smokes, the vehicle pulls strongly or braking deteriorates noticeably, stop safely and arrange assistance. Do not investigate a fault through repeated hard braking. Key rule. Replace pads as an axle set and rotors as an axle pair with new pads. Front and rear axles do not necessarily need repair together. Correct binding and leaks alongside replacement of damaged parts. Measurements to Request from the Workshop The technical explanation on bremboparts.com identifies minimum rotor thickness with the MIN TH marking. Measure several points on the working surface, excluding the outer wear lip, and compare the lowest reading with the limit for that component. Assess front and rear rotors against their respective specifications. A universal millimetre value for every Pegas, or thickness judged by eye, is not appropriate. Why the Outer Pad Does Not Tell the Whole Story Looking through a wheel reveals only part of the brake assembly. Inspect linings on both sides of every rotor and compare left and right wheels on the same axle. Check caliper pistons, seals and dust boots; inspect slides where the design uses them. Uneven wear requires investigation. Leaving binding or contamination unresolved means that a new set alone will not restore proper operation. Why Rear Brakes Need Inspection Too Even if the front pads wear faster, that does not establish that the rear axle is serviceable. Inspect inner and outer pads, rotor working surfaces and full parking brake release. This is particularly useful when buying a car with an unknown service history. Front and rear parts do not necessarily need replacing together: base the decision on the findings for each assembly. Symptoms to Describe to the Technician Describe when the symptom appears: after parking, under light pedal pressure, after warming up or on a descent. Identify where vibration is felt — in the steering wheel, pedal or body. Repeated judder during ordinary slowing should not automatically be attributed to ABS. If one wheel becomes unusually hot or one side wears faster, investigate the cause; do not touch hot brake components. If Noise Appears After Service The guidance on bremboparts.com links noise and vibration after replacement to factors including related component condition and fitting quality. Check rotor seating on the hub, runout, caliper operation and fitting hardware. New pads will not correct binding or a poorly seated rotor. After repair, obtain bedding-in instructions for the installed kit; hard stops without manufacturer guidance are not a universal cure for squealing. What Accelerates Wear and Increases Heat Load frequent stopping and acceleration in congested traffic; repeated heavy braking from high speed; long descents with passengers and luggage; a binding caliper or a parking brake that does not fully release; oil or brake fluid contamination of the linings; damaged dust boots, corrosion or restricted movement of moving components; incompatible parts or fitting errors. Check the brakes before a long journey with passengers and luggage. On extended descents, use the transmission mode specified in the vehicle instructions and avoid continuous light pedal pressure. After prolonged parking, pay attention to noise that persists during subsequent driving. Hot weather alone does not set a replacement deadline: load, mechanism condition and measurements matter. What to Check at the Parking Brake When servicing the rear axle, the technician should identify the parking brake design and follow the procedure for the fitted mechanism. On a mechanical linkage, check cables, free movement and full release. Tightening a cable does not replace diagnosis of binding or wear. Do not force a caliper piston back against unexplained resistance. After assembly, verify pedal operation, parking hold and freedom from binding. Pre-Replacement Checklist Before approving replacement, ask to see the wear or defects. Record measurements for each wheel, the permitted limits and the reason for repair on the job sheet. If wear is uneven, specify the work needed to address its cause separately. ☐ Confirm the VIN, build date and fitted brake specification. ☐ Describe noise, vibration, pulling and changes in pedal travel. ☐ Check dashboard warnings and the causes of faults. ☐ Inspect linings on both sides of every brake rotor. ☐ Record rotor thickness and minimum permitted values. ☐ Where vibration occurs, check runout and thickness variation. ☐ Inspect calipers, hoses, seals and dust boots. ☐ Confirm part numbers and required fitting hardware. ☐ Confirm the procedure for the parking brake mechanism. ☐ Verify braking and obtain bedding-in instructions. Common Service Mistakes ordering Pegas parts solely from a photograph or wheel size; replacing individual pads or a rotor on just one side of an axle; judging every lining by one visible outer pad; machining a rotor without checking permission and final thickness; skipping the rear axle because the front pads have been replaced; leaving a leak or binding unresolved after fitting new parts. Important. If fluid leaks, the pedal sinks, a wheel smokes, the vehicle pulls strongly or braking deteriorates sharply, stop safely and seek assistance. Do not continue driving with faulty brakes. Conclusion Replace Kia Pegas pads and rotors according to measured wear and confirmed defects. Inspect both axles, match parts to the VIN and actual equipment, and request measurements with the relevant limits. Uneven wear requires its cause to be corrected. After repair, verify brake operation, full parking brake release and compliance with the bedding-in instructions. If you are considering a used Kia Pegas, current offers can help you compare cars. Before buying, request the service history and inspection findings for both axles. Ask about vibration, an overheating wheel or parking brake problems: these details help assess upcoming maintenance costs.

The modern Kia K4 has front-wheel drive and a differential integrated into the transmission. There is no separate rear differential with its own oil supply. Differential lubrication therefore forms part of transmission maintenance: identify the fitted gearbox before choosing a fluid or replacement interval. Which K4 versions this article covers The information published on kia-uae.com lists 1.6 and 2.0 petrol versions with a six-speed automatic. This article covers the modern CL4-family sedan, focusing on those powertrain combinations. The K4 name and engine size alone are insufficient for fluid selection because an imported car may have a different transmission. Check the VIN, model year and transmission type before servicing. The information below comes from the 2025 K4 manual for the specified MPI automatic versions. Other configurations require their own applicable schedule. Why there is no separate rear axle oil change Through a corner, the outside wheel travels farther than the inside wheel. The differential allows the driven wheels to rotate at different speeds while continuing to transmit torque. In the front-wheel-drive K4, this mechanism sits at the front of the car within the transmission assembly. In the automatic transmissions covered here, differential lubrication forms part of the transmission’s shared system. A separate rear differential oil change is not a service item for this car. If it appears on a quotation, ask the workshop to identify the component and show where it is fitted. When the fluid needs changing The K4 owner’s manual specifies no routine ATF check or service under normal use for the 1.6 MPI and 2.0 MPI automatics. Under the listed severe conditions, replacement is due every 90,000 km. This applies to transmission fluid, not a separate differential. Choosing the applicable schedule Examples in the relevant severe-use list include frequent heavy traffic, short trips and repeated mountain driving. Describe your usual journeys to the workshop. The way the car is used matters alongside its annual mileage. The absence of a scheduled change under normal use does not mean that a leak or abnormal transmission behaviour can be ignored. If a workshop recommends servicing an otherwise healthy transmission earlier, ask for the reason and distinguish that advice from the factory schedule. Choosing the fluid The lubricant table specifies ATF SP4M-1 for these MPI automatic versions. Check the full designation: ATF alone does not establish compatibility. Gear oil intended for a separate hypoid differential is not a substitute for this transmission fluid. The same manual specifies a different fluid for IVT: SP-CVT1. Do not apply the SP4M-1 recommendation to a K4 with an IVT. Identifying the transmission matters more than the cars’ external similarity. What to check before a fluid change Ask the workshop to inspect the gearbox casing and driveshaft exits. Fluid traces should be assessed together with the level and the source of the leak. Replacing fluid without repairing a leak leaves the cause of fluid loss unresolved. A new hum, vibration or jolting calls for diagnosis first. Tyres, wheel bearings and other components can cause noise. Note the speed and load at which it occurs, and whether it changes during acceleration, coasting or cornering. A sound alone does not establish that the differential needs repair. After water exposure or substantial leakage The manual requires transmission fluid replacement after submersion in water. Tell the workshop about any flooding and arrange inspection before returning to normal use. If there is severe grinding, substantial fluid loss or loss of drive, stop safely and arrange assistance. Checking the completed work Total transmission capacity may differ from the quantity needed after a routine drain. The amount remaining inside depends on the procedure. The technician should set the level using the service instructions rather than simply adding the full capacity from a reference table. ☐ The invoice records the VIN, date, mileage and transmission type. ☐ It identifies the fluid product, specification and quantity used. ☐ The service procedure and level check are recorded. ☐ Any leaks found and the results of repairs are documented. ☐ The next service interval reflects the applicable operating conditions. Buying a used K4 When comparing current listings for the Kia K4, request the transmission service invoices. A missing rear differential service entry is normal for a front-wheel-drive car. Establish which fluid was used, whether there have been leaks or repairs, and whether the records match the vehicle’s mileage. Conclusion A front-wheel-drive Kia K4 does not need a separate rear differential service. Its integrated differential depends on the transmission’s lubrication and mechanical condition. Identify the gearbox, use its specified fluid and schedule, and investigate leaks or noise before deciding what work is needed.

The new Kia K4 sedan with its factory front-wheel-drive layout has no transfer case. It therefore needs no separate oil change for that component. If a workshop quotes for this operation, first establish whether it actually means transmission servicing. The Kia K4 technical description on worldwide.kia.com identifies front-wheel drive. This article concerns the new sedan generation introduced in 2024. Its transmission has its own maintenance requirements, but the transmission type does not turn a front-wheel-drive car into an all-wheel-drive vehicle. At a glance. The standard front-wheel-drive K4 needs no transfer case oil, filling capacity or replacement interval. Check the requirements of the transmission actually fitted. What the transfer case question really concerns A transfer case or a power take-off unit for the rear axle belongs to relevant all-wheel-drive layouts. In the K4 discussed here, power goes to the front wheels. This layout has no separate driveline to the rear wheels and no transfer case to service. A differential does not establish all-wheel drive A front-wheel-drive car also needs a differential: it allows the driven wheels to turn at different speeds while cornering. In this layout, it forms part of the front transaxle assembly. It should not automatically be treated as a separate transfer case or rear differential. Broad quotation descriptions such as “differential oil” or “drivetrain oil” need clarification. Ask the workshop to name the exact component and operation. This also helps prevent the same job being charged twice under different descriptions. Why the K4 version matters The K4 2025 specification sheet on kia-uae.com lists 1.6 and 2.0 versions with a six-speed automatic transmission. Those details apply to the configurations covered by that document. The K4 name alone is not sufficient to select a fluid without checking the vehicle specification. Engine and transmission combinations can differ between market specifications. Before service, match the VIN, model year and installed transmission identification. Do not transfer requirements found online to your car merely because the engine displacement matches. GT-Line styling and drive modes do not identify AWD Sporting bodywork, a trim name and a selected drive mode do not establish all-wheel drive. Use the vehicle’s technical build specification when preparing a service quotation. If a sales description conflicts with the documents, have it checked before buying or servicing the car. Important. Having no transfer case does not mean transmission fluid can be ignored. The transmission has its own fluid, procedure and service schedule requirements. Agree the correct transmission service Ask the workshop to show the applicable schedule and explain why work is due: scheduled maintenance, the unit’s condition or a requirement after repair. There is no interval for an absent transfer case; establish the transmission schedule separately from the documentation for your vehicle. Before work starts, agree the exact fluid and specification. “For Kia” on the label does not establish compatibility. Also confirm the replacement and level-checking procedures: the unit’s total capacity and the quantity required for a particular service operation can differ. Responding to leaks and unusual noises If humming, vibration or jerking develops, explain the circumstances. Speed, temperature, acceleration, coasting and turning are useful details. The cause needs to be identified first: changing a fluid alone does not prove that a fault has been corrected. Oil traces require the source to be located and the affected component checked. If leakage is heavy, knocking develops or drive is lost, stop safely and arrange recovery. Do not continue simply because the next mileage-based service is not yet due. Kia K4 owner’s checklist ☐ Confirm the VIN, model year and market specification. ☐ Identify the engine and installed transmission. ☐ Ask for an explanation of any “transfer case oil” quotation. ☐ Find the schedule for your specific transmission. ☐ Agree the product, work scope and level-checking procedure. ☐ Provide the service history and describe any symptoms. ☐ Keep the invoice with the date, mileage and exact fluid name. Conclusion The new front-wheel-drive Kia K4 has no separate transfer case oil change to schedule. The useful task is to identify its transmission, choose the appropriate service and ensure the quotation describes components actually fitted to the vehicle. When browsing current offers for the Kia K4, confirm its technical specification and transmission service history. Detailed records help you assess the car without relying on assumptions about its trim name.
قد تشمل إعلانات Kia K4 الفئات التالية: GT-Line Turbo، GT-Line، EX، وLXS، وغيرها. تعتمد القائمة الحالية على الدولة المختارة وسنة الصنع وتوفر السيارات. استخدم فلتر «الفئة» لمقارنة الخيارات المتاحة.
ينبغي تقييم المسافة المقطوعة إلى جانب عمر السيارة وحالتها وسجل صيانتها. قارن المسافة المقطوعة بسيارات مماثلة من سنة الصنع نفسها، وتحقق من سجل الصيانة والحالة الفعلية للسيارة قبل الشراء.
تُعرض سيارة Kia K4 حالياً على AUTO.AE بسعر ٧٨٬٨٣٧ AED. يعتمد السعر على سنة الصنع والمسافة المقطوعة والفئة والحالة والمواصفات الإقليمية. تستند هذه البيانات إلى الإعلانات النشطة وقد تتغير.
قد يعرض البائع الخاص سعراً أقل، بينما قد يقدم معرض السيارات خدمات إضافية مثل التمويل أو الضمان أو المساعدة في التأمين. تختلف الشروط، لذا تحقّق من معلومات الإعلان ووثائق السيارة وبيانات البائع.
تحقّق من بطاقة تسجيل المركبة «الملكية» (Mulkiya)، ومن تطابق رقم الهيكل (VIN) على السيارة وفي الوثائق، وبيانات المالك، وسجل الصيانة، وسجل الحوادث. وتأكد أيضاً من عدم وجود قرض قائم أو مخالفات أو قيود أخرى على السيارة. ويُفضّل إجراء فحص مستقل قبل إتمام الصفقة.
نعم. يمكنك الاتفاق مع البائع على إجراء فحص فني مستقل في مركز خدمة من اختيارك. يساعد الفحص على تقييم حالة المحرك وناقل الحركة والهيكل والأنظمة الإلكترونية والمكوّنات الأخرى.
يعني مصطلح GCC Specs أن السيارة صُنعت وفق المواصفات المعتمدة لأسواق دول مجلس التعاون الخليجي. وعادةً ما تكون هذه الإصدارات مصممة لتناسب الظروف المناخية المحلية. لكن GCC Specs بحد ذاتها لا تثبت حالة السيارة ولا تعني وجود ضمان ساري؛ لذا يجب التحقق من حالة السيارة والضمان بشكل منفصل.
تقدم بعض معارض السيارات خيارات تمويل. وعند توفرها، قد تُذكر الشروط أو قيمة القسط الشهري التقديرية في الإعلان. تعتمد نسبة الفائدة النهائية والموافقة على البنك والدفعة الأولى وبيانات المشتري.


